Exercise 1.3

I started by redrawing my hand-drawn candle and book and adding some colours similar to the original ones. (Fig1) Then I decided to add some texture to my objects (Fig2). As my last experiments, I added my own photographs instead of the texture and I think it created a very interesting outcome. Overall I enjoyed this exercise as I am familiar with Adobe Illustrator and Photoshop and I am looking forward to experimenting with media more and create both physical and digital collages as I find it great creativity boosting activity.

Fig.1
Fig.2
Fig.3

Exercise 1.2

I truly enjoyed this exercise as I love experimenting with media. In Method 1, I started doing something I tried in the first exercise and I found it enjoyable and that was drawing a one-line drawing. It turned out well and I managed to make real looking objects. Then I did a pencil sketch drawing with some shading which I believe showed the texture of my objects the best. I also experimented with watercolours to bring some colours to my work and then my sister’s crayons which I remind me of childhood.
In Method 2 I tried sticking colourful newspaper pieces on my sketch drawing. I liked the outcome however it shows only the shape and size of my objects, not the texture or colour. I also tried sticking some coloured cotton on a paper to create m a candle and a book. It looks a bit messy but as it is experimenting I do not mind.

For my Method 3, I created an ink drawing which looks messy and I tried to overdraw lines to make them look raw and I added pieces of uncoloured thread on some areas. I like the outcome as it gives this coarse look. I think I managed to experiment with a wide range of media however I think I could use them better to show the texture of my objects, make the difference in smooth and rough.

Exercise 1.1

I found this exercise interesting, especially the part with not being able to correct my mistakes but rather embracing them. I chose a coloured glass vase and wooden coloured box. After observing them for a while I started working on my drawings. I found drawing with closed eyes challenging as immediately after lifting my pencil from a paper I got lost in proportion and connecting lines. The negative space was also a bit difficult as you had to think of the surrounding background and your objects as something cutting through it as light through the darkness. I enjoyed the Tonal, I made 2 versions, one with lines and one with finger smudged lines which I like more.

Continuous Lines
From Memory
Negative Space
Blind Drawing
Tonal- smugded lines
Tonal – lines

Personal Reflection on Part 3: Scale: Spaces & Objects

Throughout Part 3 I learned a lot of new things and improved many of my skills. Firstly I think I did a much better job in recording the process and taking it as a part of the task rather than the outcome itself. I also feel like I improved in mind-mapping by making them by hand, more personal and connecting my findings and ideas. I am glad I started to use a new program AutoCAD, even though it was a pain at the beginning with all the new buttons and I wouldn’t be able to count how many times I did the mistake and after 1 full hour all I have done was a rectangle with 1 more rectangle in the middle. I truly enjoyed even the mistakes I made because they taught me a lot, like Exercise 3.2 about the difference between Planometric and Isometric. I am looking forward to improving my skills in AutoCAD as well as drawing skills. I am happy I had to push myself to make drawings and sketches by hand as my hand is a tool that I always carry with me and it is great to be able to make quick sketches and understand 3D objects based on something as simple as a plan & elevation. In the future, I would like to spend more time on reading and broadening my knowledge since I saw what a huge impact ” How the line became straight” had on my way of thinking and work.

Exercise 3.3

I found this exercise enjoyable but time-consuming. I was struggling with the order of lines and I constantly felt like I am not doing the angles correctly helping myself with lines. I managed to produce a neat parallel drawing of a lantern I chose as my object in Project 1. Now that I am observing my final work I believe I could go more in details like creating the crossing also in the back or making the circle holes look more like holes. In general, I am happy with what I produced and I am looking forward to improving my digital skills further.

Lantern Planometric Drawing

Exercise 3.2

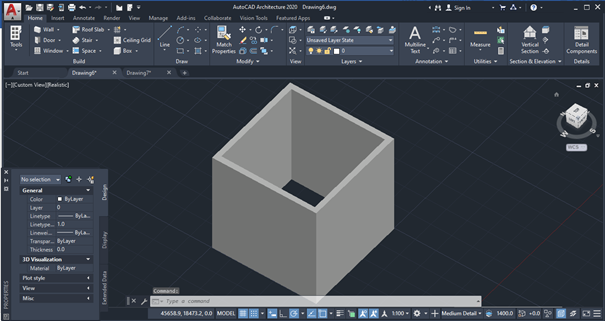
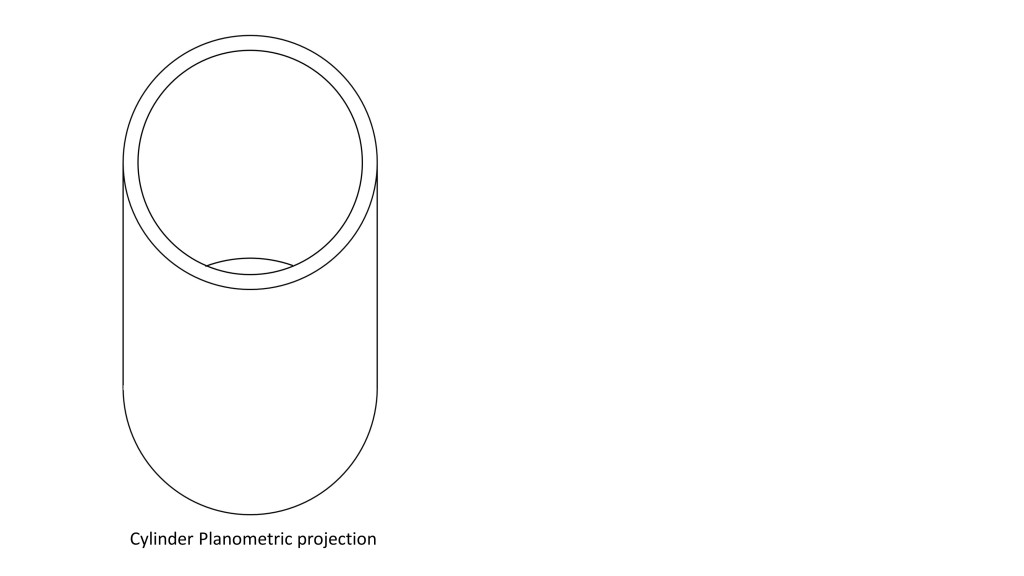
When I started this exercise I was sure that my task is to make a 3D hollow cube & cylinder in AutoCAD. When I finished and started googling how to convert them into a planometric projection I found out it is not possible as the view is unreal. Even after this information I was stubborn and tried to rotate my objects but I ended up with an oval-shaped plan, angled plan in cubes and simply I realised myself that this was not the correct way of doing this exercise and there is no way I could make my 3D objects look planometric.

Later on, I just did what I would do by hand, created a 3D looking object using a 2D drawing. After connecting all the points, measuring lines and angles I managed to produce neat looking planometric projections. I am happy with what this exercise taught me even though it was a long process with mistakes. What I was trying to do earlier was most probably an isometric projection, in order to have a planometric my plan had to remain the same.

Exercise 3.1

I found this exercise enjoyable. I followed the instructions and It was nice to see how the lines are nicely connecting in the corners creating a realistic looking drawing. This exercise also helped me to understand the projections better. For the future I need to figure out how to make the circles look darker using a compass, perhaps I did not have correct graphite because even if I pushed the compass harder towards the paper the lines did not seem thick enough.

Drawing planometric projection 45°

Drawing planometric projection 45°
Planometric projection 45°
Drawing planometric projection 60/30°
Drawing planometric projection
Planometric projection

Axonometric and Planometric drawings

I think I understood the basics of projections however I still get a little bit confused between planometric projection with 45° angles and isometric projection. I believe I will understand it better by time & with practice. For me personally, the easiest way to differentiate whether the projection is Axonometric or Planometric is to ask myself ” Does the plan remain the same or is the plan angled?” If we are talking about a cube I would ask myself whether the plan is a square and if it remained the same angles.

Planometric 1 | Container architecture, Container design, Shipping ...
Fig.1 Planometric 45° angle

Planometric Drawing of Cafe by TeddyAndAntlers on DeviantArt (With ...
Fig.2 Planometric drawing 45° angle
Isometric projection Building Business Architectural drawing ...
Fig.3 Isometric Projection of Buildings

Fig.1 (2011). Available at: https://baplin.wordpress.com/2011/04/09/drawing-and-planning-for-home-furnishings/screen-shot-2011-12-08-at-5-41-25-pm/ [Accessed 28 Apr. 2020].

Fig.2 (n.d.). Planometric Drawing of Cafe. Available at: https://www.deviantart.com/teddyandantlers/art/Planometric-Drawing-of-Cafe-556700136 [Accessed 28 Apr. 2020].

Fig.3 (n.d.). Isometric projection Building Business Architectural drawing Service. Available at: https://www.pngwing.com/en/free-png-zwdeh [Accessed 28 Apr. 2020].

Exploded axonometric drawings- examples

Fig.1
Suarez House,Exploded Axonometric
Fig.2
Digital Portfolio: Exploded Axonometric Diagrams Research | Peter ...
Fig.3

Fig.1
(n.d.). How To Exploded Axonometric View in Photoshop from Show It Better. Available at: https://cgtricks.com/exploded-axonometric-view-photoshop-show-better/ [Accessed 28 Apr. 2020].

Fig.2
(n.d.). Exploded Axonometric. Available at: https://www.archdaily.com/777716/suarez-house-arq2g-arquitectura/5653bbdde58eceb25f000055-suarez-house-arq2g-arquitectura-exploded-axonometric [Accessed 28 Apr. 2020].

Fig.3
Strong, P. (n.d.). Available at: https://peterstrongid.wordpress.com/2014/04/01/digital-portfolio-exploded-axonometric-diagrams-research/ [Accessed 28 Apr. 2020].

Reflection on the feedback from my tutor

For my feedback, I received an overall “well done” for my good quality work and ability to adapt to changing circumstances due to COVID-19. Reflecting on my feedback I decided to underline positive feedback in green colour, negative in orange and suggestions for future/ changes in blue. It helped me to focus on specific parts better and understand which parts shall I focus on in the future.

I am glad to know that I managed to compile information from different sources and produced thorough research on Innovative Materials as well as giving interesting varied examples on Truth to Materials. I also made an insightful observation about distinguishing materials through touch and I should remember to include it in my research too. I was praised for writing about architecture in my region Tekov and bringing my ideas an personal experience in my work. I have to remember not to overuse InDesign, as although I manage to produce a clear and concise design, my outcome did not show much from the mind making process. When presenting information I should focus on presenting as relevant information as possible. I should also include much more process of mind mapping, analysing and thinking in my research rather than my final work. Mind mapping is about connecting information gathered and I should not be scared to use lines to connect them, the mind mapping is not only about putting together all the gathered information. When it comes to my writing I should use my own words as often as possible and use direct quotes in moderation and my tutor reminded me that it is okay to disagree with the views of others too. For my assignment, I was suggested to include more of the information I gathered to communicate the key aspects of the space better.

Based on my feedback I decided to change or update some of my previous work.

  • Adding Fixing Methods in my Material Chart as in future it will be important to know which materials work together
  • Uploading my Innovative Materials sheet to the student forum for peer feedback.
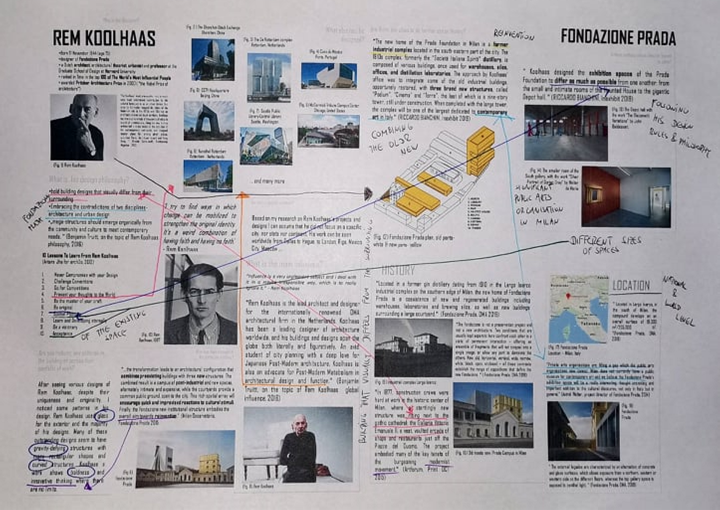
  • Printing my mindmap and adding my personal notes, connections and ideas in it.
  • Making the information I present more relevant and specific. Example: Fondazione Prada Location
  • Updating my final Assignment and presenting all the essential information gathered in more detail.